
Introduction
When I was about 14, my dad bought himself and I matching titanium bikes. I had been getting into cycling on his 70’s era steel frame with friction shifters, and this titanium bike would now be the first proper bike of my own. It was not my last bike, we’ve gotten dozens of mostly carbon fiber framed bikes since then, but I overhauled my dad’s pair of the bike later and used it during much of my traveling around the world, riding with it, racing with it, and stealing Strava crowns with it all across the world. Despite being dropped-kick by airlines a dozen time, it’s held up well (unlike when I fly with carbon bikes, which I have had broken) outlasting a number of other (carbon) road bikes over the years.
Titanium is a pretty amazing material. It’s effectively rust proof. It is lightweight and strong. Carbon fiber still makes better bikes. It has amazing strength for its weight, and unlike metal bikes, which are basically sticks glued together, it can be sculpted into almost any shape. That shaping makes it possible for it to be tuned to be better at everything at the same time than any metal framed bike.
So why metal? One big reason is that metal fails in a lot more predictable way, and it bends before breaking. Carbon isn’t weaker, it is more than metal is more intuitive in its failure mode to the human brain. Also, to make the lightest possible bikes, some carbon bikes often get made rather thin in some areas. I trust my carbon bikes, properly cared for, to last a lifetime but looking at building a bike that I can fly with and abuse for decades, metal is better. Steel and aluminum are also more eco-friendly than carbon fiber, being less energy intensive to make, although I would avoid steel in places with salty sea air or salt thrown on the roads in winter.
Another neat thing about metal-framed bikes is that you can fairly easily get one custom made for you however you like. And that is what I set out to do here.
I really only had one reason to replace my old titanium bike. Disc brakes. Of all the many shiny upgrades the bike industry has made over the years, this is the one I have used and that I feel I need. Rim brakes work fine on aluminum rims, but disc brakes are better and I feel much safer, and am much safer, riding with them, and disc brakes require a whole new frame (actually you can just swap the fork, my gravel bike is a rim brake ‘cross bike that I swapped just for a front disc, and it works well, the front brake has most of the stopping potential).
But I am ambitious engineer, and I didn’t just want disc brakes, I wanted more.
My Criteria
- I wanted a titanium frame that was as aerodynamic as possible given the constraints of metal tubes and welded joints.
- I wanted a bike I could get Strava segments with
- I wanted an extremely corrosion resistant bike that I could ride in winter or in the salt-filled puddles of early spring
- I wanted good tire clearance so I could run fatter tires for winter and gravel as desired. My design goal being 45c with fenders and 51c with tight clearance.
- I wanted fender and rack bolt mounts. For commuting, both are really nice to have, and I wanted this to be able to support some ‘lightweight’ bike packing (ie fly to England with my bike, do a 2 or 3 day ride hotel-to-hotel or cabin-to-cabin, not all the tents and everything). You can skip these mount points (‘strap on’ fender and thru-axle rack options have gotten much better, but having the bolts is nice to have if you can).
- I wanted this to be adjustable so that my wife could ride it too (not as a perfect fit, but say I fly with it to Paris, I can go on a 2 hour ride in morning, then she on a 30 minute ride after)
I was expecting to fail to meet at least one criteria, but it all worked out with almost no tradeoffs.
The tradeoffs.
I told the frame builders that I didn’t care about these at all
- Weight. Trying to save 200g from a bike frame will not make you faster (aerodynamics matters far more). I like the idea of a sturdier frame. Weird thing is, this bike weighs more than my Tarmac, but feels lighter when you lift it (I think because it looks like metal and has thick tri-spoke wheels, the brain is expecting much heavier than it gets). I can always splash out the cash later to get SRAM red cranks and cassette to save 500g.
- No Comfort gimmicks. I wanted the frame as stiff as possible. The best way to add comfort is to add bigger, better tires at the right pressure (which I already design for). Using a carbon seat post and handlebars helps too. Design the frame for stiffness then soften as needed with your buildout.
- Criterium racing performance. I wanted this bike to be fast, but I did not design the geometry for pedaling fast through corners. There is a greater risk of pedal strikes with my geometry, but I don’t race crits anymore so it is not something I need.
- Cost. This is actually one of my cheaper bikes (to my surprise) coming in at only around $4000 built, but that’s still a lot of money for a bike to many people.
Geometry
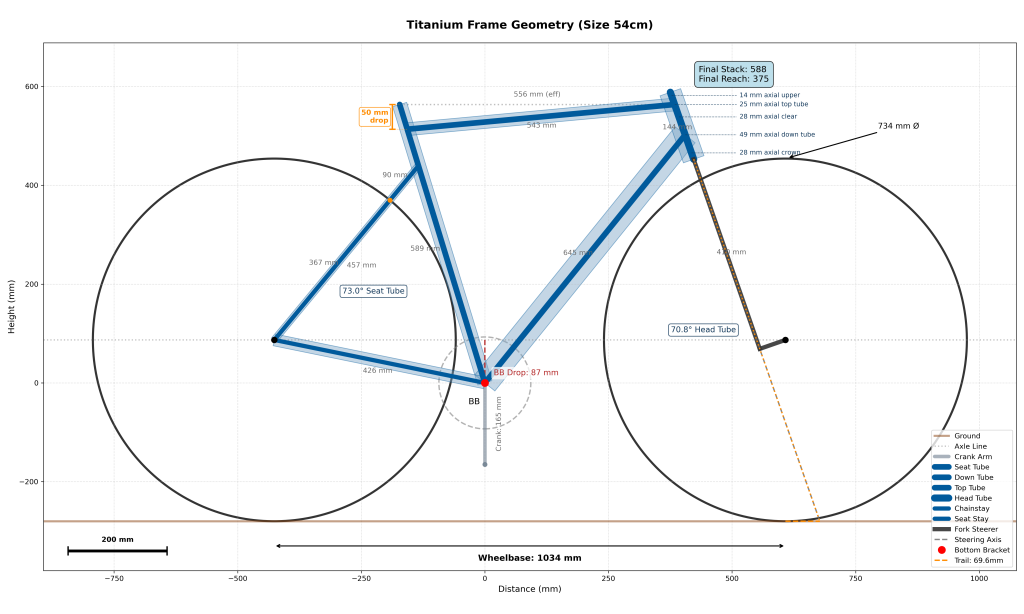
Let’s start with one of the simpler ones: design to share with my wife. I usually ride a 56 cm size frame, but I have also ridden comfortably on properly adjusted 54 cm and 58 cm frames. So here I sized my geometry towards more of a 54 cm, she being 5’6”.
Her biggest issue is actually standover height. She wants to be able to sit in the saddle and lean to the side and touch the ground. It’s not really possible (you have to learn to just get off the seat when stopped) but its a common instinct. However, we can do a lower center of gravity by having a greater bottom bracket drop, which will help.
Lower bottom bracket drop does a few good things for us: it makes the bike more stable, which is good for winter/ice riding. It also makes the bike a tiny bit more aero (a little more of the frame brought in closer together). I can get away with this because I know I will be riding shorter cranks (165 mm, perhaps even less), larger tires (32 mm or larger for sure) and won’t be doing crit racing on this bike. I ended up going with an 87 mm bb drop, but I think if I was to do it again I would push to at least 90 mm.
To pin down the rest of my frame geometry, I looked at the post frame geometry specs of frames I had ridden and liked. I generally tried to meet the stiffness requirements (shorter stays), aerodynamic requirements (trying to squeeze large tires in tight with the frame), and stability requirements (aiming for a bike that might ride on ice, so longer wheel base and a slacker headset and slacker seat tube angle).
Although I am rather confused because this bike actually feels more nimble than my Tarmac, when it was designed to be slower and more stable (my wife rates it as stable). It might be because I am not used to having flat bars on something more like a road bike. Bike geometry is a complex science I do not fully understand.
I made a script in Python to mock up geometry for the builder. Feel free to reuse this yourself. It’s not a full final CAD design, but enough to dial the builder in quickly.
Aerodynamics
Drag due to air is invisible, yet it is the thing that slows you down most of all while cycling, even at slower speeds. At racing speeds, it is well over 90% of all force you need to overcome. Do you need need an e-bike? No, you need to be more aero and to remember to shift into an easy gear when you go up hills (looking at you, all beginners ever).
Why should someone who is not a racer care about aerodynamics? The answer is headwinds. Even if you can’t sustain 60 kmh, the combination of your speed and a headwind can! I am continually impressed with my time trial bike, when I point it into a headwind and still it flies forward. Headwinds, hills, and basic maintenance understanding are the main blockers to new riders getting into cycle.
A proper titanium bike will never be as aerodynamic or as fast as the top carbon bikes. As someone who has a Specialized Tarmac and Trek Speed Concept TT bike, undeniably in the tops of their classes at the time of writing, I can say those bikes are faster than either my old or new titanium bikes, but the differences are fairly small, and the new titanium bike is faster than my gravel bike while being able to fit larger tires.
Here’s one thing to know if you don’t already: the bike is not the most important part of aerodynamics, the human body is. You should focus on a more aerodynamic bike position (narrower handlebars, more forward leaning, which yes can be done comfortably). Then get yourself an aero ‘skinsuit’ and an aerodynamic helmet. Think those look silly? Here’s a hint: to non-cyclist, all cyclists look silly already, and to cyclists, the sexiest thing is speed. So don’t worry about how you look. Delight in how fast you can fly!
Aero principles
- You want to guide air apart, rather than shoving it aside, a nose rather than plate
- You want to guide as little air as possible, keep area smaller when possible. While playing with shape (drag coefficient) is often most effective, worth remembering that keeping area small the (A part of CdA) is also useful.
- Air also needs to be guided back together, a cylinder is worse than a teardrop because there is dead space (low pressure) behind the cylinder that pulls air in from both sides such that they smash together
- Crosswinds can lead to perfect teardrop shapes not working as well, plus manufacturing constraints and UCI rules mean that slightly truncated airfoils are often seen (not going to a full point)
- Dirty (turbulent) air is already messed up (energy already input) so it is often effective to put non-aerodynamic elements into already dirty air regions
- Jets of air pushed by another component can pair badly with low pressure areas that then pull those jets into vortices. Deep fairing head tubes and disc wheels can help straighten airflow off the front wheel and rear of the frame and drivetrain respectively.
- Tops of the wheels are moving into the airflow at twice the speed of the rest of the bicycle, which means quadratically higher drag. Their movement also skews the path of airflow upward.
- Adding small turbulence can occasionally be useful in front of low pressure areas you can’t easily fill, such as behind the rider’s back, vortex generators add little mixers that can pull together (‘energize the boundary layer’) the air faster and more cleanly in the wake, but often adding turbulence just slows things down
- UCI, Triathlon, and other aero restrictions make no sense. They allow all sorts of aerodynamic structures but ban others randomly (the rules are mostly driven by the aesthetic principles and nostalgia of some old guys). Safety is mostly driven by course design (dangerous descents, corners in sprints, potholes) and of course weather and wind. Note that aerodynamic clothing made for triathlon can potentially be a bit faster than that aimed at cycling as it doesn’t have to conform to UCI limits on fabric height.
- Don’t believe most aerodynamic marketing. Wind tunnel testing is expensive and difficult to reproduce even with the best effort, and most companies don’t put in best effort. Some companies do develop good aero talent, but even then with different riders, with different body types and positions, it doesn’t always translate well to you (not a complete list, but Specialized, Trek, Canyon, Cervelo, Swiss Side, Huub, Fusion are some I have higher ‘general impressions’ of, although behind the scenes these are often driven by 1 or 2 talented engineers, who, if they switch companies or leadership decides to switch to wasting all their money on marketing rather than R&D, can see companies rise and fall in aerodynamics quickly).
Real-World Metal-Frame Aerodynamic Guidelines
Here is what I actually did to get my metal frame more aerodynamic
The head tube is one of the highest drag areas of the bike frame, because it is larger, at the front, and gets upwash from the wheel. Here is where I put two of my neatest hacks: splitter plates and trip wires.
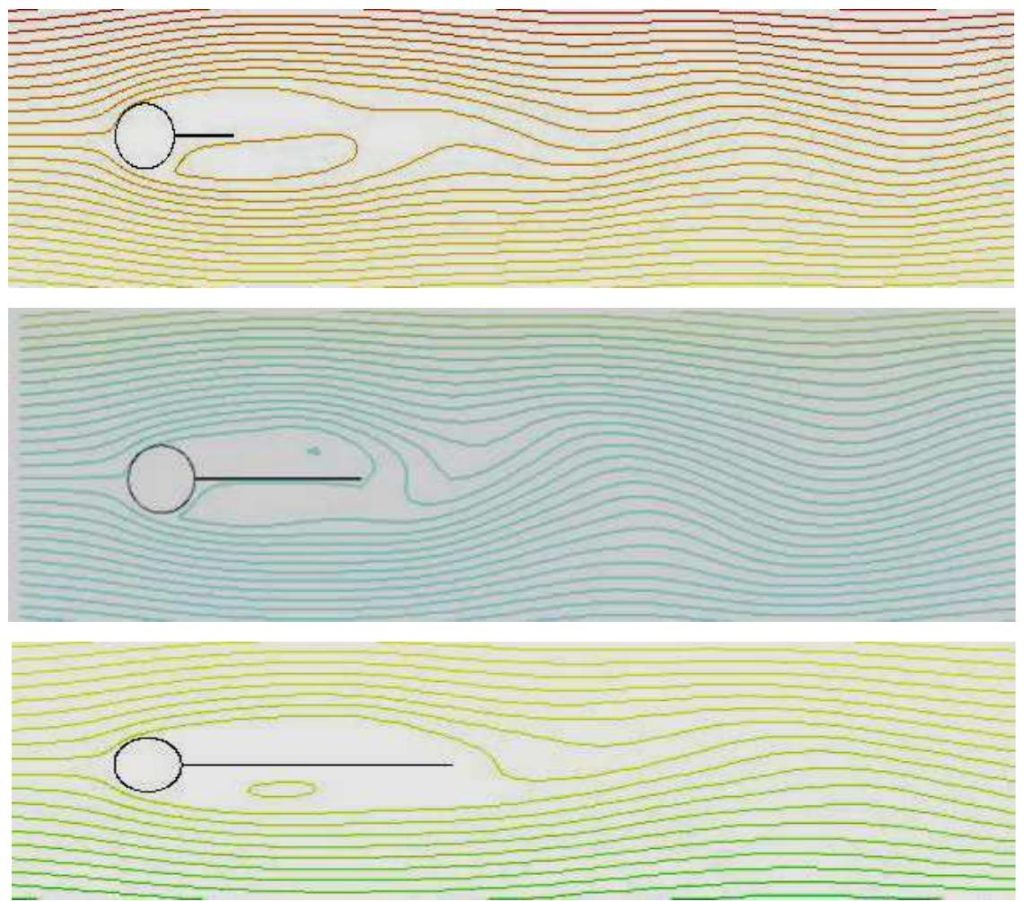
Splitter Plate. I have never seen one of these on a bike before for aerodynamic purposes, but it is very similar to a gusset sometimes seem on metal mountain bikes, which means it is something manufacturers are generally familiar with. The concept is simple, you ‘split’ the turbulence zone in half, reducing the size of vortex and providing a guide to reattached airflow to. Papers seem to suggest around 2 times the diameter behind the cylinder is the useful depth to extend this to.
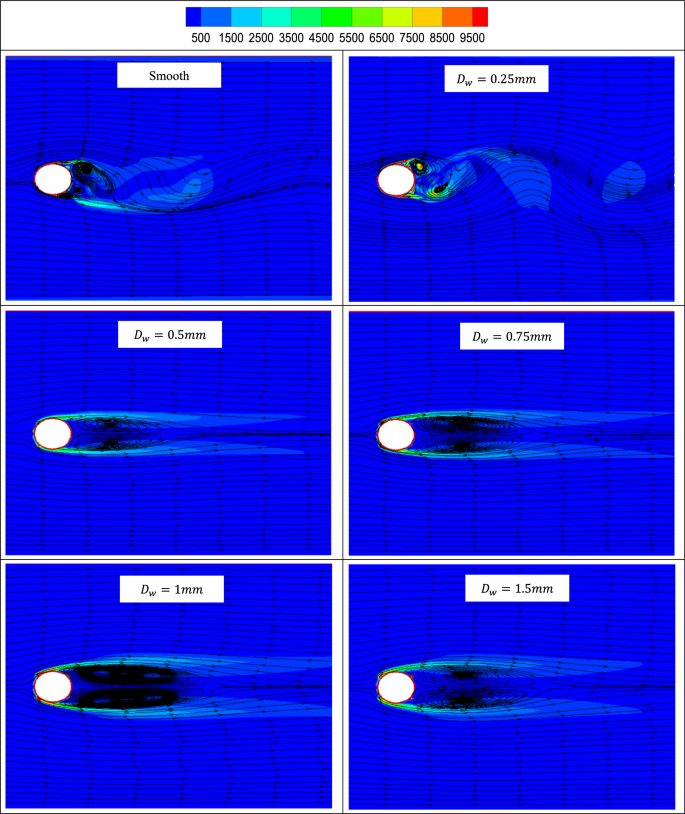
Trip Wires. These occur on the front face of the cylinder. They usually are quite shallow (around 3 mm here seems the target depth), and are around 60 degrees apart (so 30 degrees to either side of the front most part of the headtube). The idea here is to energize the boundary layer, helping keep flow attached around more of the headset (a bit like why golfballs have bumps).
On the rear set tube, I placed PTFE tape, 15 mm wide on the leading edge to try and have the same effect by the seam at the edges of the tape. It’s only about 1 mm thick, so perhaps too thin to provide the optimal amount of turbulence, I doubt the benefits of that would even be measurable in a wind tunnel, but it is easy and low risk to do.
Papers mentioned another variation on this trip wire called the “upstream control rod”. This is where you “wash” the cylinder with turbulence by placing a small rod 1.5 to 2 diameters (diameter here = headset diameter) upstream. This promotes attachment and reduces drag. It won’t work as well in crosswinds, but it did occur to me that a hydraulic brake tube is almost exactly the right size. Try fixing it in place directly in front of the head tube, something like 7 cm in front.
The main selling point behind splitter plates and trip wires is that they could, in theory, reduce headset drag by around 40% while using relatively common and simple welding techniques. Both are well studied in scientific literature, and while the exact sizing and placement (including consideration of crosswinds) could use some work, the likelihood of benefit is high. The rest of the items here are more familiar aerodynamic principles, but worth a reminder.
Use ovalized or teardrop tubes for downtube and seat stays. The drag coefficient of round tubes is worse than an oval tube and much worse than a airfoil shape. If you must use round tubes, use them at an angle relative to the wind. Even a small 15 degrees off vertical gives a 5% reduction in drag (because angled, the round tube has an oval cross section relative to the wind).

Round seat tubes are simply a lot more practical than aero ones. You can mitigate the drag loss by using a skinnier tube (27.2 or even 25.4 mm). Skinnier also is more compliant to road vibration. What else is cool about round tubes? It is easy to slide a fairing on over the top. I’ve got code for you to 3d print your own slide on fairing to any size you want: https://github.com/winedarksea/catlin_bicycle
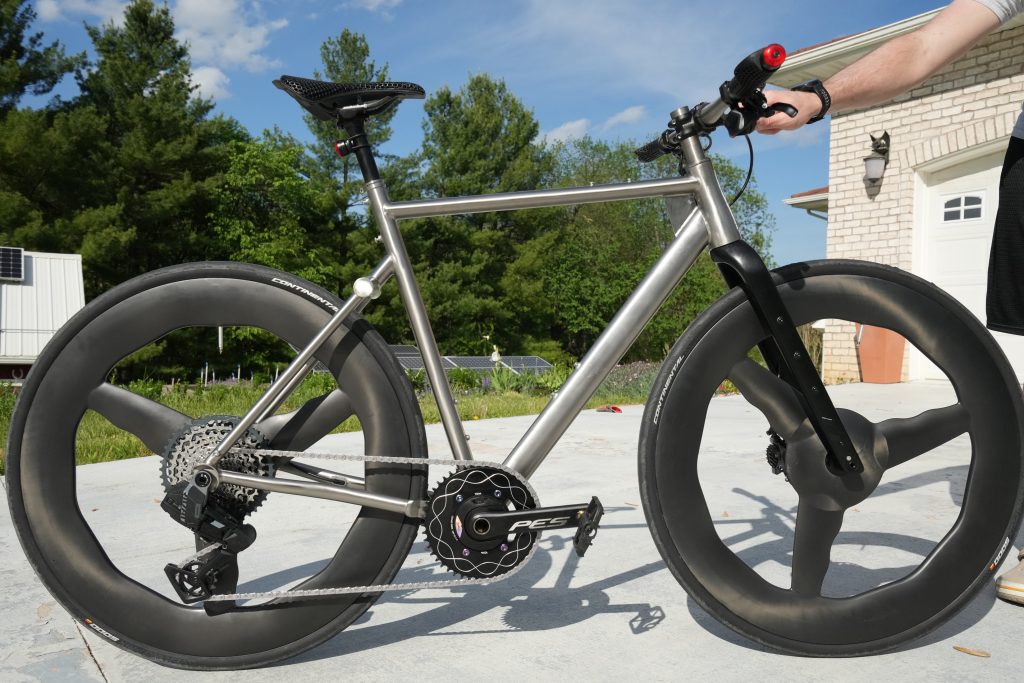
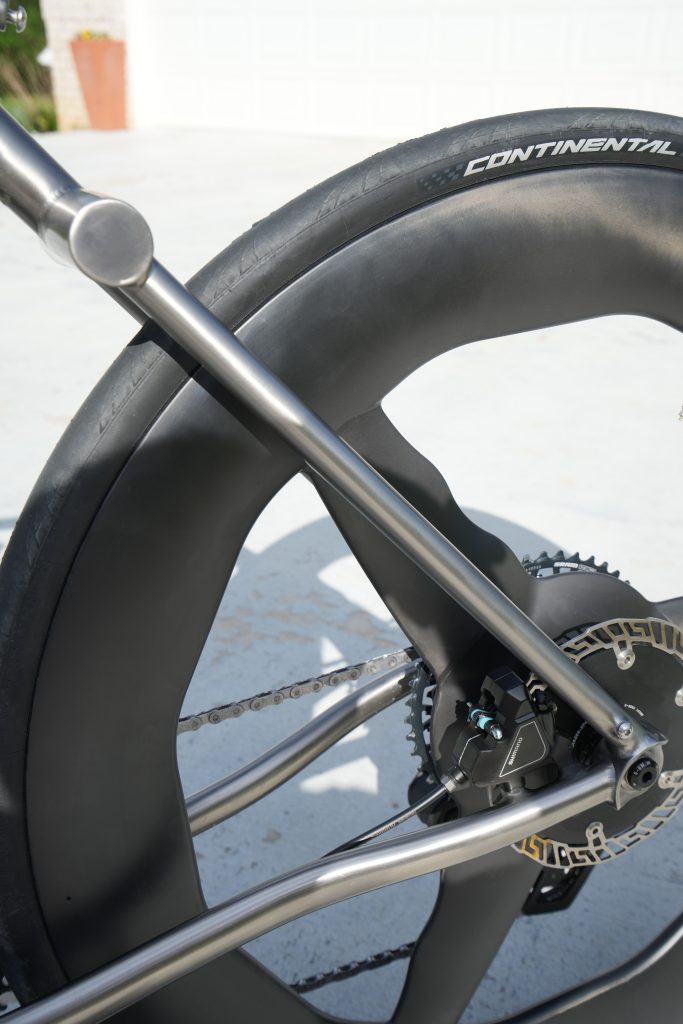
The concept of a dropped “mono stay” for the seat stay was another aerodynamic idea: hide more of the seat stays behind the seat tube. This didn’t work out as well as I hoped for aerodynamics because the “cross beam” ended up being rather large. However I still like this design because it allowed easy clearance for large tires while keeping shorter seat stays and chain stays (paired with a CNC’d “yoke” for clearance by the BB). Shorter stays are one of the key elements to lateral stiffness and great sprinting performance.
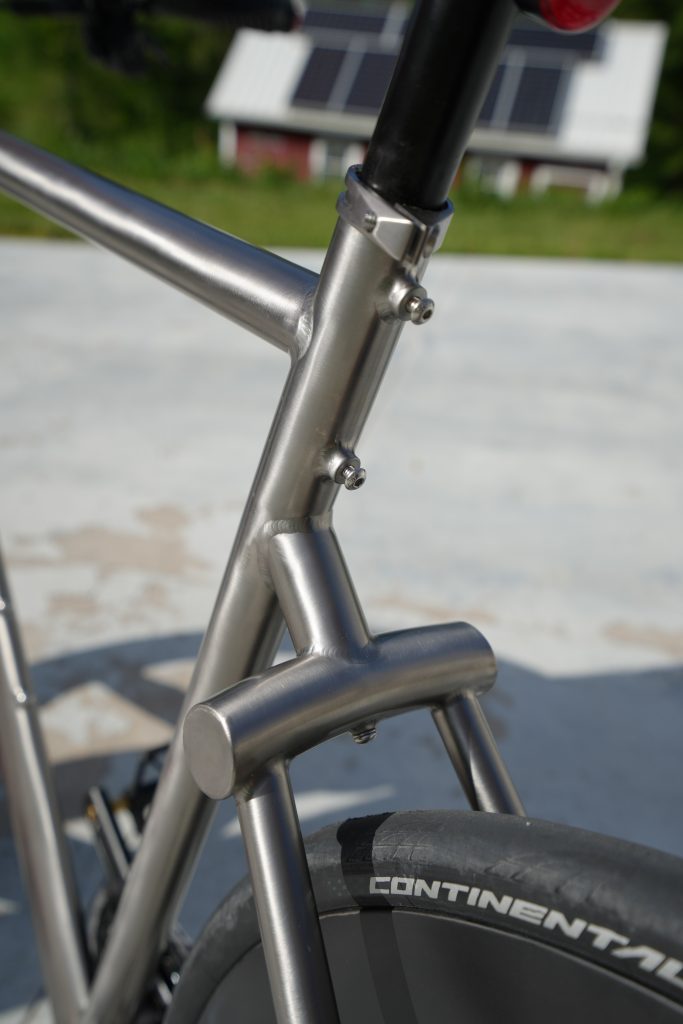
I was actually expecting the “cross beam” to be open-ended, but they capped it. Waltly Titanium I think did a rather impressive welding job here (but I’m no expert here). I actually would have been fine with something uglier, but I appreciate the quality here.
One thing I skipped was 100% integrated cable routing. Both the fork I used and the frame are partly internal routing, but they are briefly external past the headset then enter the fork and frame. Those tubes don’t add that much drag, a few inches of exposed tube won’t make that much of a difference, and it does make design, long term part sourcing, and maintenance much easier than the (mostly proprietary) internal routing headset options.
I added water bottle bolt locations behind the headset and behind the seat tube over the wheel but not for water bottles. I haven’t done it yet, but I had the idea of being able to 3d print fairings to bolt on here to smooth the airflow. A skinny toolbox can help shield the rear wheel.
I also added a hole in the splitter plate gusset so I could theoretically 3d print and bolt on a teardrop profile to fit behind the headset. I like the idea of structural, simpler titanium tubes with non-structural 3d printed (or injection molded) plastic parts for reduced drag added on top. I think there is a lot of potential for these sorts of ideas going forward for metal-frame manufacturers.
This blog post is a good read, with talking through how to adjust the top tube to seat tube connection (a little angled is good, but not so much is puts high speed air on the rear wheel).
Skipping the front derailleur, as I did here, also reduces drag. 1x works well for me, but not for everyone.
Not intentionally for aerodynamics, but the very wide fork and seat stays for wider tire clearance, when paired with only 32 mm tires, look rather like some of the more radical track bikes. These place the fork and seat stay more in line with the rider’s legs which could theoretically reduce drag.
Narrower handlebars and aero wheels are important, but you can always swap those in later. Aero water bottles and mounts are less swappable with other riders but good for solo riding. Clip-on aero bars can be added (go with the u-shaped one piece ones, the split ones tend to move more).
Strava
One place that aerodynamics doesn’t matter so much? Strava segments. That may surprise you. There are a couple of reasons. The first is tailwinds. Many segments go in only one direction, with a strong tailwind, your airspeed is close to zero, and aerodynamics don’t matter. In real world conditions, wind often is gusting erratically or bent by terrain, so often during a segment, even with a tailwind, you will get a bit of a cross or even a head wind, so aerodynamics still helps, it is just a much smaller piece.
One thing I have learned is my TT bike is actually rather poor at getting segments despite being so aero, at least any shorter than a minute or so. The reason is that the position and setup on that bike greatly limits my sprint power output. It’s hard for me to hit 600 watts on my TT bike where as twice that, 1200W, is perfectly feasible on my road bike. Going into this new bike, I knew that I wanted a frame that was as stiff as possible, and also with a solid handlebar position allowing both maximum power and aerodynamic positions.
Stiffness quick notes:
- Large bottom bracket (T47-86) with large tubes connected to it (using an aero but large downtube)
- Shorter, thick seat and chain stays
- Separation between the top tube and the downtube at the headset.
- Tapered headset
- Thru-axles (standard these days)
- Flattened top tube
Designing a Bike for Winter
I used to commute all winter long here in Minnesota (before remote work was more common). You will see competing arguments on what is best for winter riding because there are several different challenges.
Here is the best bike for winter: an internal geared hub (Rohloff or similar) with a carbon belt drive, and 4.5” studded fat bike tires, fenders, carbon fiber components, and bar mitts (or similar bike-attached gloves/pogies, paired with lighter gloves on hands). The belt drive and internal hub don’t jam up in ice build up and are mostly rust proof. The low pressure fat tires float on snow, and the studs bite through ice. The carbon fiber components conduct less heat. With a bike like this, you can ride (almost) fearlessly in winter.
Road bars are a bit of a limitation on a fat bike, we had one built by my sister that way and it was great except on the more technical end of riding on deep snow and ice where it was a clear disadvantage over wider flat bars (more stable). Something like a Moloko bar might be a compromise for a more aero position.
Metal pedals, handlebars, and saddle rails pull heat away from the body, aluminum is by far the worst, carbon steel better, titanium alloy and stainless steel are better, and plastic and carbon fiber are the best for minimal thermal conductivity. Avoid aluminum on parts in contact or nearly in contact with your body if riding in cold weather frequently.
What you will notice is that my bike design is not the perfect winter bike. The problem is that the ‘perfect’ internal geared fat bike is niche, expensive item that is heavy and clearly slower in good-condition riding which most of my riding is. You can swap 2” gravel tires onto a fat bike and make it surprisingly good in summer, but not “Strava crown” fast.
I have found that skinnier tires like 45c tires are still pretty decent for winter. They cut through snow, have stud options. Tricks like only running a studded tire on the front can help reduce the drag lost when less ice is expected. My bike should be good enough for winter riding, but it will require more care to ride it in winter than the bike described above.
I will say, the trispoke wheels I went with really catch cross winds and will push you around in strong winds. I knew this going in, but wanted them anyway. One thing I like about these one-piece carbon wheels is they will slice through snow better and don’t have the spoke holes (and metal spoke parts) to catch salt water and rust.
Rust Proofing a Bike
One of the main target riding times for my new bike is early spring. In early spring we often have lucky warm days that demand one goes out and ride their bike in after a winter on the trainer. But there is a secrete danger: puddles of melting snow water packed full of salt still on the roads from winter ice management.
Chlorides (road salts, ocean salt, table salt) are one of the harshest, most corrosive substance known to metal. They will splash in an destroy your drivetrain, your bearings, your bolts, and anything metal. Washing your bike well immediately, every time after riding on salt-water roads can help, but its a lot of labor, and not everyone has a good place to wash their bike.
Steel is especially vulnerable to chlorides and it is VERY hard to get steel out of the picture of a bike entirely. So many bolts and bearings are only available in steel. Crank spindles are only available in aluminum and steel that I have found. Aluminum might sound like a good choice, but it is actually also very vulnerable to salt water corrosion, and combined with other factors like lower fatigue life make it a suboptimal choice.
Here is the hierarchy of metals for salt water resistance:
Titanium > 316 Stainless (duplex 2205 even better) > Aluminum (6061/7005 > 7075 apparently) > 304 Stainless (440C) > Carbon/Chromoly Steels
Carbon fiber and plastics are also good choices, obviously, but you can’t get carbon bolts and bearings. The big picture here is titanium is a really good long term metal for rust resistance, and you can find titanium bolts and screws appropriate for most bike parts (they are sold targeting weight weenies trying to save a few grams). Most stainless steels you find are actually still fairly vulnerable to chlorides, but the more expensive and harder-to-find stainless steels like 316 are pretty close to titanium in corrosion resistance.
You might think this is case for ceramic bearings in ceramic races, but I’ve found ceramic bearings crack and are worse long term than steel bearings. You can sometimes find stainless steel bearings, but in limited sizes. Fully sealed bearings (2RS) are a little slower but a good option for a commuter bike. My solution is to use a washout resistant lubricant around the bearings with embedded anti-corrosion properties. Krytox GPL 225 is one example. I went with an easier to find Christo-Lube MCG 129 which is apparently popular with saltwater scuba divers (seems a fit). Fluorinated PTFE lubes with corrosion inhibiters is the general idea. Bikes greases are usually on the thicker side so aim for thicker formulas. Using the Christo-Lube I find my headset is now almost too smooth and fluid at turning.
Coatings are the general solution to parts you can’t easily swap titanium or carbon versions in for. I ended up using Cerakote MC-2200 multipurpose clear coat. It’s like a permanent version of a ceramic car coating (yes, most car coatings are temporary, it’s actually an advantage sometimes. If you mess up the MC-2200 coating, or in my case, spill it on the floor, it’s impossible to remove all of it…). Some other options to consider are bake-on Cerakote coatings (if you have the spray gun and oven), cold galvanizing (zinc based) paints, and shorter term ceramic coatings.
I put MC-2200 almost everywhere (many thick coats applied to the cleaned steel spindle), and I am glad I put it on my frame too, because being hydrophobic, at least for now while it is fresh it sheds dust and water really well. One place to avoid of course are the disc brake discs and pads, never coat those with anything.
I went with a chain over an internal hub because I have found that a good waxed chain actually holds up fairly well in salt water. You might need to replace it at the end of every winter, but should be able to last a winter. Some chains come with extra layers of rust protection as well. Here I went with a KMC XFlat EPT waxed chain (the EPT claims to be a better rust resistant coating). Hot waxing is fairly easy once you have the setup, just try not to contaminate the wax too much, clean the chain well first.
I explored the idea of sacrificial anodes on a bike too. Apparently they require continuous immersion to be effective so not practical for a bike. But if you, for some strange reason, plan to bike in deep water a lot, consider getting an M6 threaded braze on near your bottom bracket and add a sacrificial Zinc or Magnesium Anode (pencil type, m6 thread seems more common).
Some other notes about metal. Titanium to Titanium can cold weld itself, needs anti-seize between any parts you want to remove later. Dissimilar metals need galvanic isolation, especially aluminum to titanium (the aluminum corrodes even faster, the titanium is fine). Try to avoid aluminum on your titanium bike.
On Sourcing Parts
As someone who suffered a broken collarbone from a major, US brand-name manufacturer’s fork failing on a new bike, I can say, brand name doesn’t protect you from defects. It just gives you someone to sue afterwards. I have had an Aliexpress part fail on me too, a cheap Garmin mount made of mild steel. I knew it was cheaply made, but it was the only one that I could find that mounted as I wanted for that case. My Garmin was fine.
Most of the titanium bolts came from Aliexpress here. It’s hard to find them outside of China. The main key is not going with the cheapest possible solutions to things and not trying to find the lightest weight possible version of a thing. I feel I usually trust CNC machined things that list a reasonable alloy. When it comes to carbon, I try to look for a larger volume original manufacturer (all the bike brands don’t just go to Taiwan because it is cheaper, but because they have all the expertise and depth of skill and genuinely do it better). In China, look for manufacturing in the Xiamen area which has the greatest skill concentration of that industry in China.
It’s really hard to say what price is fair for a thing. The front fork of m Trek Speed Concept for example is $650 list to the customer, $150 to the dealer from Trek, and likely something like $50 to Trek from the Taiwanese manufacturer (why all the markups? Well, the lower volumes and harder design of TT bikes are one part, I’m guessing the big markup from dealer price to MSRP is to help cover the absolute pain that installing aero headsets can be on a fully integrated TT bike).
-scaled.png)
Standardized Part Specs
One little thing that annoys me about my old titanium bike is that it has a proprietary derailleur hanger design. Most bikes do (or did). I could find replacements when it bent, but for how long?
The new UDH derailleur standard (also allows me to use the SRAM AXS 13 speed groups) is one nice part. The T47-86 threaded bottom bracket (threaded is way better than press fit), and the IS42 (41.8) / IS52 headset (no fancy aero routing) all should be a easy to replace long term. Look for common sizes where you can.
As an aside, this bike is my third “no front derailleur” ‘one-by’ bike. It saves weight and money, but my other bikes doing this (going back to the 11 speed era) were flat terrain speed machines not for long climbs. Here, with SRAM 1×13 speed, 48T front ring with a 10-46T cassette, it really seems to have reached a good level for general riding. I think going touring in the mountains I would still want a front derailleur, but generally I feel this design is enough for me.
I can highly recommend Waltly Titanium, the company that built this custom frame. They handled all my elaborate, custom requests with ease, and the price for the quality of their work is amazing. You can see all the frame specs I requested from them here.
Also thanks to Behind Bars in NE Minneapolis, the shop who built up this bike. They were a bit skeptical about some of my requests, but did a great job in the end.
Flat or Road Bars
Handlebars were one thing I haven’t fully landed on yet. The design plan was to use setup with hydraulic quick connects (Zeno Q-connect) so that I could easily switch between road and flat (mountain) bars at will. Using SRAM wireless shifting and the right hydraulic brake levers and calipers, you can officially do this (although you have to be a bit careful in which components you choose, only some mountain/road are cross compatible, many are not) so that it would have both road and mountain bike levers and shifters setup and paired. But I decided to start a bit simpler, and use ‘pursuit’ style handlebars (see on fixie and track bikes sometimes) as my road option (which have the right diameter to slide the mtb brake levers and shifter onto).
Colin Catlin 2026