
I have been wanting to test some microphones capabilities in the ultrasonic range (>20 kHz), which unfortunately most speakers aren’t rated to do. Well, they can do it usually, it’s just not part of the design because it is outside the audible range. I was also hoping to learn a bit more about speakers. So, I decided to build my own speaker.
To be fair, I am not actually building the speaker, merely assembling one to my own design. I chose a AS07808AS-R driver as a speaker by scrolling through the Digikey speaker pages. There’s a couple factors to look for:
- Speaker efficiency (sometimes called sensitivity), usually a number between 70 and 110 decibels, it is (usually) the amount of power that a speaker can generate at 1W. For this application with TRRS wiring, a higher sensitivity would be much better, but I went with a rather modest 82 db rated speaker because of other factors.
- Frequency range: this was really important for my application as I wanted something that is ultrasonic range, which is fairly rare. For a single standalone speaker, in general, you would want it to cover as much of the 20Hz to 20 kHz range as possible. Of course, for multiple speaker setups (subwoofer, tweeter, etc) each component would just need to cover their desired range.
- Power rating: a number in Watts, the max power that can be input into the device. Generally you want a speaker that is rated higher than the max your audio source can generate. Bigger numbers generally mean the device can get louder, although efficiency is actually more important in this regard.
- Impedance: speakers tend to be 8Ω or 4Ω, headphones 32Ω to hundreds of ohms. None of these is necessarily better, although for this application a higher impedance device is probably a bit better.
- IP rating. A nice to have but not need to have, here the chosen speaker has an IP54 rating.
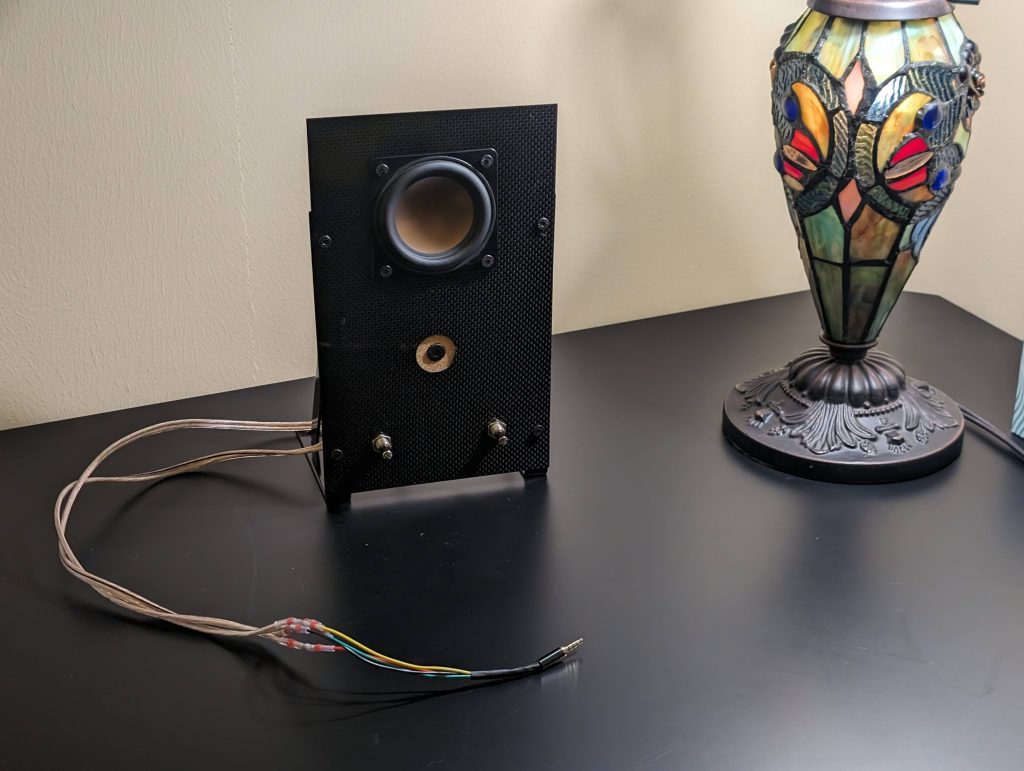
I chose to wire this directly to a TRRS cable with the CTIA standard. This is a standard headset cable so for all intents and purposes what I am building would be seen by any connected device as a set of headphones. This means I can include a microphone and I’ll be using the very high sensitivity AOM-5024L as my microphone of choice.
Why TRRS? Because I wanted simplicity and assumed that the more components I added, the more noise and reduced audio quality I would generate. What is the big problem with this? Volume. Headphone jacks aren’t designed to drive lots of power so this speaker won’t get very loud. One solution I have is to combine the stereo inputs into a single mono speaker, so we get the sum of two channels = more volume. The other solution would be to use a very highly efficient speaker (such as 110 db) which I actually do not have (mine is rather low efficiency) because I was aiming for the ultrasonic range as well.
Wiring:
- Speaker ground and microphone ground combined and sent here to R2 (ring closest to sleeve) per CTIA wiring
- Speaker positive split into two wires, one to each potentiometer (to the middle, adjustable resistance position of the potentiometer). Then a wire from one of the fixed ends of each potentiometer to stereo left and stereo right (ring 1 and tip of TRRS in CTIA).
- Microphone positive to sleeve of microphone jack.
- I used 16 gauge speaker wire where I had room, and then 22 gauge wiring into the jack and to the microphone. I used this TRRS jack and even 22 gauge was a tight fit. I used solder seal heatshrink on this, my first time using this, it was fine but not really any better than regular soldering plus heatshrink.
Surprisingly Amazon was a better source for the potentiometer than Digikey. I went with 2W 100 ohm potentiometers with mounting hardware already included. Although with my testing and the 8 ohm speaker I was using, I actually think a 200 ohm potentiometer might have been a better choice.
Enclosure design for speakers is actually a fairly complicated science. The box needs to resonant in certain ways. To avoid this, I went with an open baffle design, just a single panel in which the speaker is mounted flush. For mic testing as well, I want to avoid complicated resonance. Two shelf brackets are then used to hold the speaker upright. I went with carbon fiber for the panel because I thought it would look cool. The microphone is mounted in cork (a cork coaster like for hot drinks with a hole poked into it) which is then epoxied to back of the carbon fiber, with the goal of the cork dampening vibrations to the microphone, as well as cork and carbon fiber providing a nice contrast.
Drilling and cutting carbon fiber is harder than wood though, and the micro fibers thrown up as dust are not the best for one to breath in (I wore an N95 mask, as it is what I had on hand). A drill press worked for the mic, shelf, and potentiometer holes, while a router was needed to cut the bigger circle for the speaker. For anyone else thinking to repeat this, I might suggest for simplicity to use a small speaker driver like one used in headphones as they tend to be the most efficient, and make the whole setup really skinny, just an inch or two across, then this could all be made using a drill press or handheld drill.
Wiring the audio jack was the most difficult part as it is a rather tight space. In order to confirm that I hadn’t shorted anything I measured the wiring by applying 5V to each part of the plug in turn and seeing which wires were measurable with 5V on the other end (and if there was a short, more than one wire would show the voltage potential).
One of my concerns was that the TRRS cable wiring wouldn’t be able to handle the current and power of the theoretical max of 5W out of the JDS Atom 2 headphone amp. But a little testing suggests this is not a real concern as not one of the parts has been observed to get in the least bit hot even at max power.
An unintentional drop test revealed a flaw to my design, the microphone cables came off too easily. This looks like it could be a common problem with microphone capsules which don’t exactly give much room for strong solder joints (especially since you have to avoid not bridging the outer shielding of the mic capsule). My solution (after resoldering) was to use a bunch of electrical tape. Not the most elegant, but all that really matters is any tension or movement is not transferred to the microphone solder junctions but is instead dissipated further up the wire.
I measured the loudness (‘sound pressure level’) at about 10 centimeters (not the the standard 1 meter!). Max volume with a phone (Pixel 8 Pro via Apple USB C to audio DAC adapter): 65 decibels, and via the JBS Atom 2 amp: 75 db. On a Lenovo Legion laptop, 75 db max direct from audio port, and with amp, 91 db. From a Mac 81 db direct and 91 db with amp. Measured on an American Recorder SPL–8810, observing the peak decibels playing the James Bond opening theme.
The conclusion from testing and real world use is that this is perfectly acceptable audio range for video conferencing, and indeed the quality microphone makes this attractive for that use. From the Mac or with the amp and any laptop, the volume is loud enough that it would be louder than I am comfortable with if sitting next to me on a desk. Still, I think most people would be more satisfied if a very high efficiency speaker was used so that the volume could be even louder from the same power.
One thing I did not expect was that as the impedance on the potentiometers increases, the volume increases. I thought it would be the other way around (my reasoning due to V=RI, lower resistance should be more power at the same voltage, but apparently it’s more complicated here). This might in part be the quirks of the DACs, I know the apple DAC in laptops increases voltage when it detects higher impendance at a certain threshold.
Overall, it works! I was immensely satisfied with this, all succeeding on the first try without too much time or bother. What I get is a speaker with a much more detailed datasheet than anything I could get with most commercial speakers, for my ultrasonic testing. The nice video conferencing option, speaker and mic looks promising as well.