
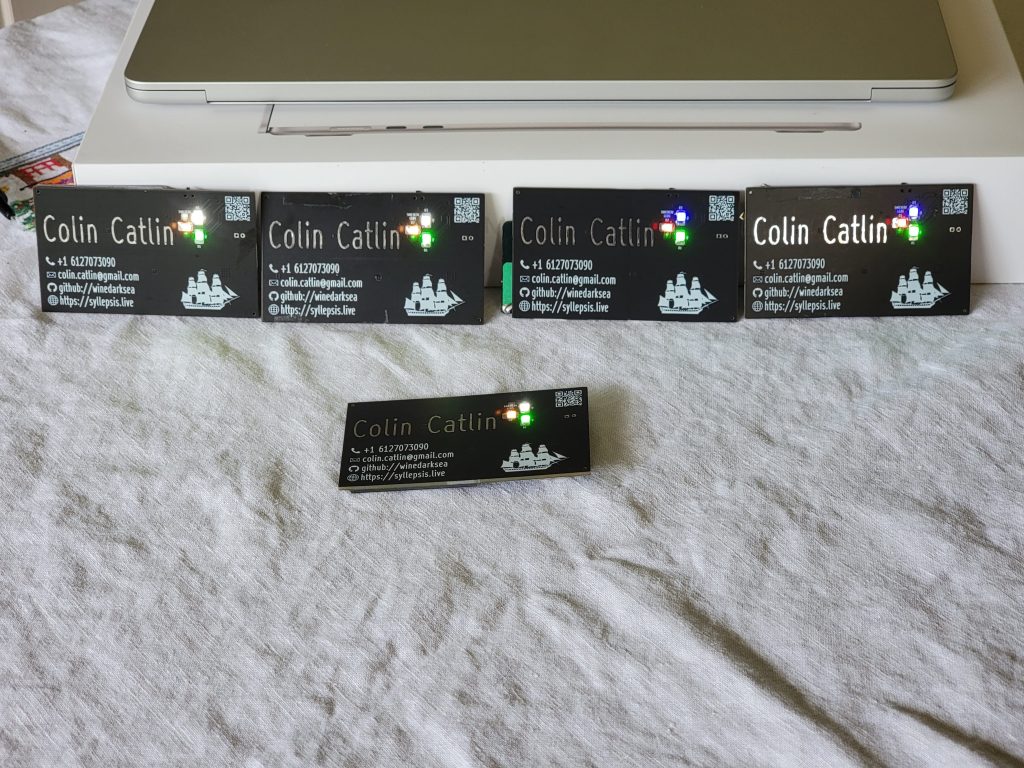
In this project, I made myself a business card. It is a solar-charging RGB LED flashlight as well. In this post I’ll talk about the design and some of the testing done, in case you should like to make one yourself.
A couple of years ago, I saw a ‘this business card runs Linux’ post on the internet, and a few others who have made variations since then. I love the idea, but also struggled to see the purpose. They had to be plugged into a computer, a computer that was without a doubt much faster than the business card. I only rarely need to hand out business cards, so having a fairly expensive one, but one that makes a splash, is worth it. But what to do instead of a linux card?
Of course, I have been a long-running fan of solar power. And who doesn’t love colorful LEDs? With these thoughts floating around in my head, and armed with my freshly acquired (solid but still completely amateur level) PCB design knowledge, I eventually came up with this design. While still a bit of a gimmick, it is undeniably useful as well. I also wanted this design to serve as the potential basis for an IOT sensor power system, and with the power it provides it would be more than sufficient for a MCU and sensor sending occasional signals and sleeping in between.
There are two main design constraints here:
1. Safety: it should not start the car of the big CEO I just gave this to on fire
2. Cost: this is going to be expensive by business card standards, but it would be nice to be not make it too crazily expensive
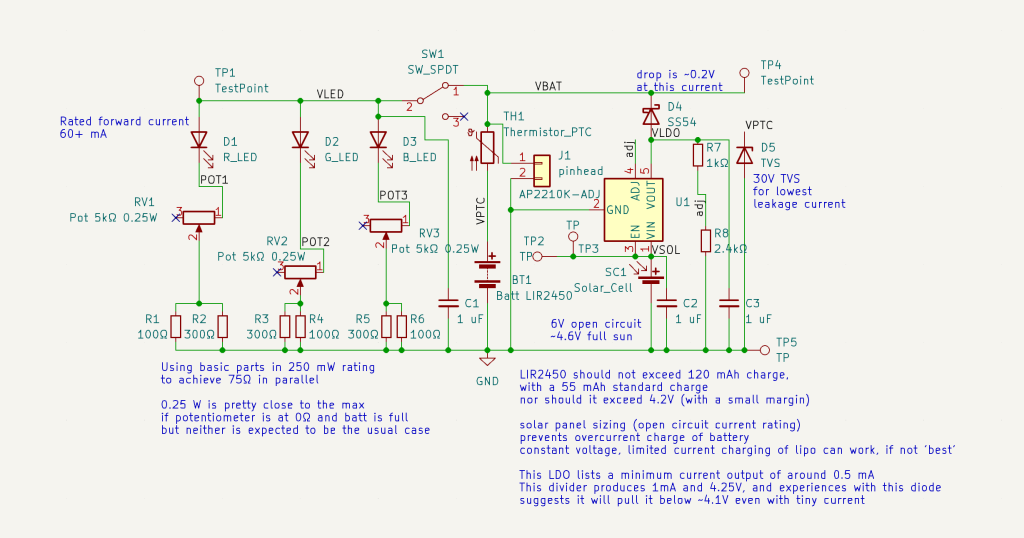
Overall, the concept is simple. Power from a solar panel flows through voltage regulation to charge the battery. The battery in turn provides the current for the LEDs when the switch is closed, with potentiometers present to adjust the relative resistance (and thereby brightness) of each LED. A few diodes and a PTC fuse provide some protections.
There are two things that reviewers on Reddit immediately jumped all over when they saw this schematic, but which improvements on were limited by cost. The first is that there are dedicated energy harvester ICs that maximize solar power. Great in theory, but most of the ones I saw were close to $10 each in low volumes. If you are interested in a non-business card use case, search for solar power managers and energy harvesters, some using Chinese-brand ICs are not so expensive but with incomprehensible datasheets. I also opted to skip a battery charging IC and go with a custom, cheaper setup. That scared people but so far has worked well in testing. Let’s dive into that.
Lithium Ion battery charging chips are very common and a bit specialized. The main problem with lithium ion batteries is that they have a tendency to start on fire if abused, and since most people aren’t clear on the exact tolerances, opt for these chips certified to work. And in general, I would do the same, but not here.
The lithium battery chosen here is the lithium version of the CR2450 (the alkaline battery won’t work here), usually called an LIR2450 or similar. Most version of this do not have battery protection ICs built in like many battery packs do. This battery was chosen because this is really the only rechargeable battery option that will fit on the card sized circuit board.
Lithium ion batteries aren’t magical explosives, they are, after all, used in dozens of devices you own, and following a few simple rules should be sufficient for safety. The main advantage we have is that the small solar panels are not capable of generating particularly massive amounts of power. What li-ions don’t like is lots of current (amount relative to the charge capacity of a particular pack, generally bigger batteries can charge with more current) and lots of voltage (pretty standard among all 1 cell lithium ions, 4.2V is the most often seen max voltage, but actually high quality packs get pushed to 4.6V, 4.0V is sometimes seen as a number for best battery lifespan). Reduce charge current to a ‘trickle’ charge when near the max voltage. These batteries also don’t like being extremely discharged, somewhere in the 3V range. Full depletion doesn’t risk fire, but damages the batteries ability to hold capacity. The batteries should also not be charged in very hot or cold temperatures, although they are fine with any temperature that humans are likely to spend any extended period of time in.
Here, max charge current is limited by the solar panel size. Max voltage is limited by an LDO. And minimum voltage is regulated by LED dropout voltage. A fun little fact here is that the diode between LDO and battery has a voltage dropout that decreases with decreasing current, effectively enforcing a trickle charge from about 4.0 to 4.2V, which I think is pretty neat.
Solar panel voltage is regulated down to charge voltage by an LDO. The low dropout LDO is not the most efficient choice for maximal power consumption, but was chosen because it is efficient at very low current (which in poor lighting is the case) and it is cheaper and simpler than switching regulators. I don’t think there is much point in using a buck boost regulator as panels at low voltage rarely contain enough power to be worth boosting. Effectively this card will not charge well exposed to indoor lighting because panels simply won’t pick up much voltage (I’ve found it can sometimes go from 0 to 20% charged but never 80% to 100% charged indoors). Most panels do fine with cloudy weather, to my surprise, if sitting outside.
For other safety, a TVS diode helps handle ESD (although the diode is definitely optional, and keep an eye on leakage current). Also the PTC fuse, the Bourns MF-MSMF020-2 PTC RESET FUSE 30V 200MA 1812 as I chose, should handle a number of cases – reducing or stopping current flow in high heat and preventing overcurrent charge or discharge of the battery.
The potentiometers are surprisingly expensive. One could potentially remove them to save cost and have a fixed brightness LED. Less cool but probably equally practical. These here are hard to turn (screwdriver or excellent finger nails are recommended) and are near their max power rating, but nice giant knobs just don’t fit on a business card.
I spent a lot of time gleefully running through DigiKey’s LED catalog. I love finding highly power efficient selections. And there are lots of colors. But as I discovered, the most practical for flashlight purposes are those with a narrow viewing angle (I found some with 80 degree angles). What it does not work with are true RGB leds which would also require a microcontroller, here there are three static colors that can be mixed in the analog manner. Feel free to comment if you need LED chip suggestions.
LEDs were mostly just fun to experiment with, but solar panels were a more critical component to make decisions on. I had originally planned to use the Voltaic Systems 0.3W panels but I found they reacted very poorly to being hot air soldered. I fell back on the even more expensive Any Solar SM141K10LV Monocrystalline Solar Cell 307 mW 6.91 V which worked great. The main criteria for the panel is that it needs to fit on the darn card in a moderately elegant manner. So the much cheaper Aliexpress panel I got, the SUNYIMA 10PC 5.5V 50mA Solar Panel Polycrystalline 68*37MM, and which worked great for powering the card, failed in application because it just didn’t fit on the card. Something like it could probably fit with a redesign, or tolerance of a slightly larger than normal business card. Maybe a better online detective could find a cheap panel that also fits on the regular sized card. Adjust the soldering pads on the board if you have a panel with different back pads.
The exact panel voltage isn’t particularly important but the LDO has a max power dispersion, the one used here should be fine up to almost 12V with a bit of power. Most panels “open circuit voltage” only needs to be tolerated briefly as the actual load voltage (usually listed as Max PMP or something) is lower. It’s a tradeoff. A higher voltage panel would be better at charging in lower light, generally, but will waste more power to the LDO when in full sun. Most panels listed as ~6V should be a safe bet. Maybe in the 5 – 9V listed range, *waves hand vaguely.
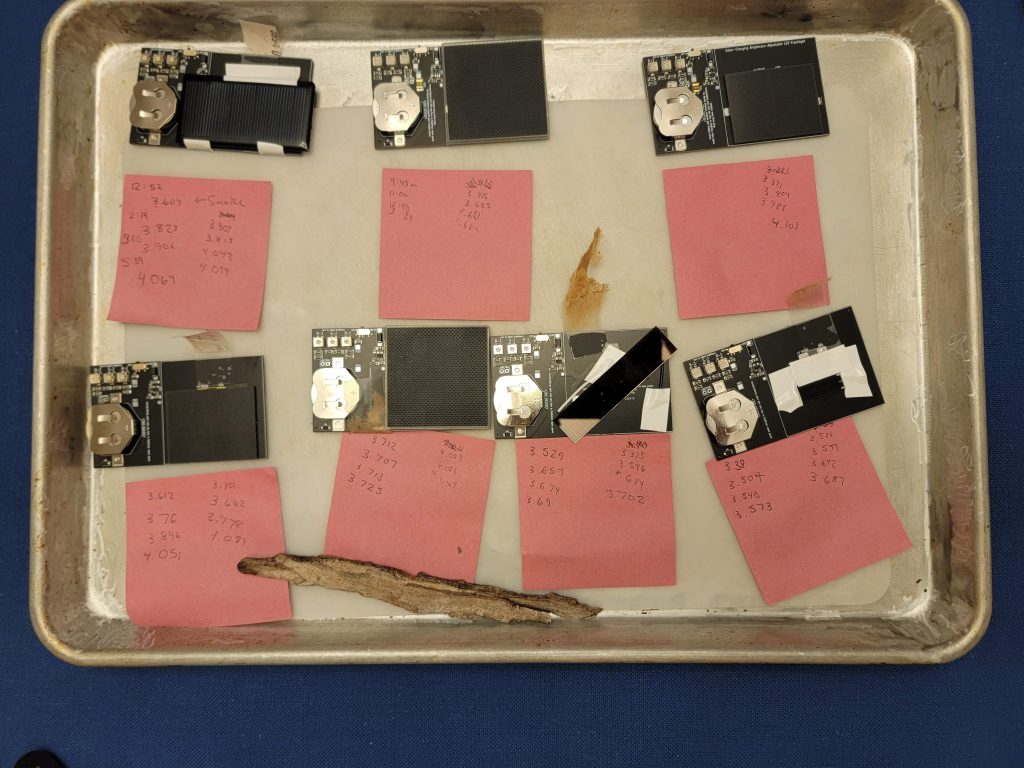
I performed a side by side test of a number of panels, as seen in the photo here. Two tests, full sun, one with smoke in the air from wildfires. A tiny panel worked but was too slow to be practical. The bigger the panel, the faster the charge. That correlation was the only obvious conclusion. I also had an “amorphous” panel like is traditional on solar calculators. I was disappointed by its performance. From what I’ve read, monocrystalline panels are the most efficient, while the more common polycrystalline panels are almost as good and cheaper.
Overall, this was a fun little project, and has definitely generated more interest than any other business card would have. Details are on GitHub, feel free to make a version for yourself!