
As I am designing a house, I have gone down the path of the ‘perfect wall’, working towards thick layers of continuous insulation and no roof overhangs. No roof overhangs really points towards using standing seam metal over rainscreen as siding. You might arrive at using standing seam metal siding for other reasons, simple longevity or aesthetic preference. Even with roof overhangs, anything that goes through the siding (any type of siding) poses two problems, firstly thermal bridging (they tend to pull lots of heat in or out of the building, bypassing insulation), and secondly these penetrations tend to be hard to seal long term, generating leaks, which lead to mold and rot. If you want a high performance house that lasts a long time, avoiding anything going through the siding (and roofing) is important.
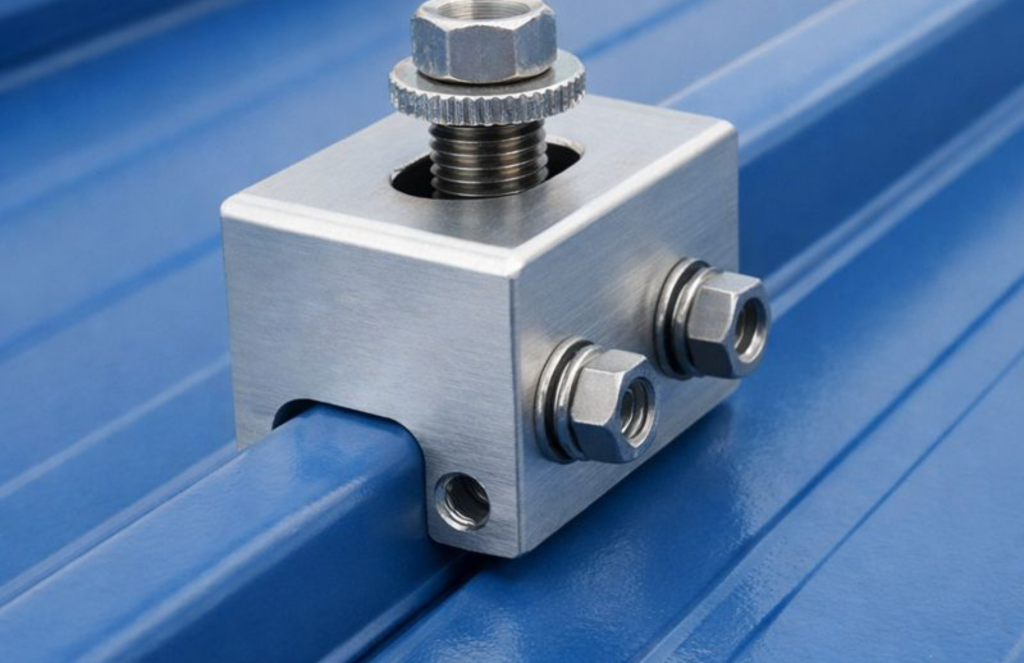
Standing seam metal clamps are just bolt on brackets that can support standard bolted on items. They are really used for two main purposes, holding solar panels to roofs and holding snow guards to roofs (bars on the roof to control snow avalanches off the roof). But the neat thing about them is that they are approved structural devices which do not penetrate the insulation or cladding of a building thus bypassing the thermal and moisture issues! S-5! seems to be the primary company selling these.
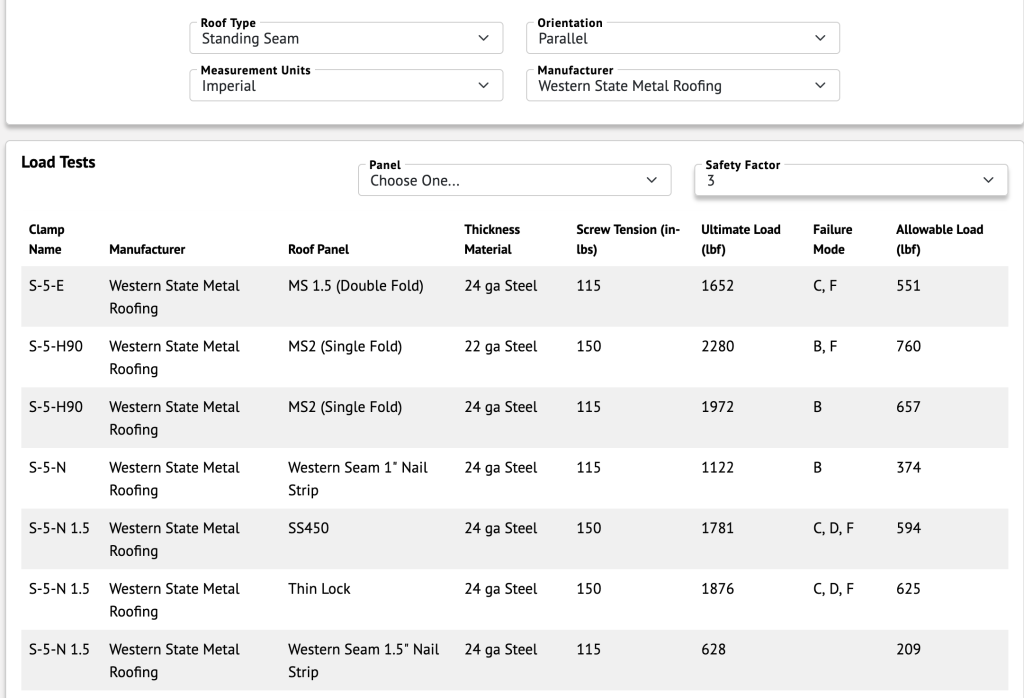
Going into this, I was assuming that my crazy ideas would be violating the engineering specs of these clamps, but that appears to be wrong. S-5! publishes normal force (uplift, on siding force straight out from the wall) and parallel force (drag, here the force applied down the wall) for the clamps, that even with a high safety factor of 3, should be usable (with proper care and consideration) for all the ideas that follow. The main concern is actually the sheathing or furring strip fastener strength and the standing seam siding clips (here, by clips I refer to clamps holding the panels from underneath, not the S-5! clamps). Likely any design that uses these will want to use a tighter/increased fastener and clip density in the target area, which needs to be done before/as siding is installed! So plan in advance if you are considering using any of these ideas that are heavier loads.
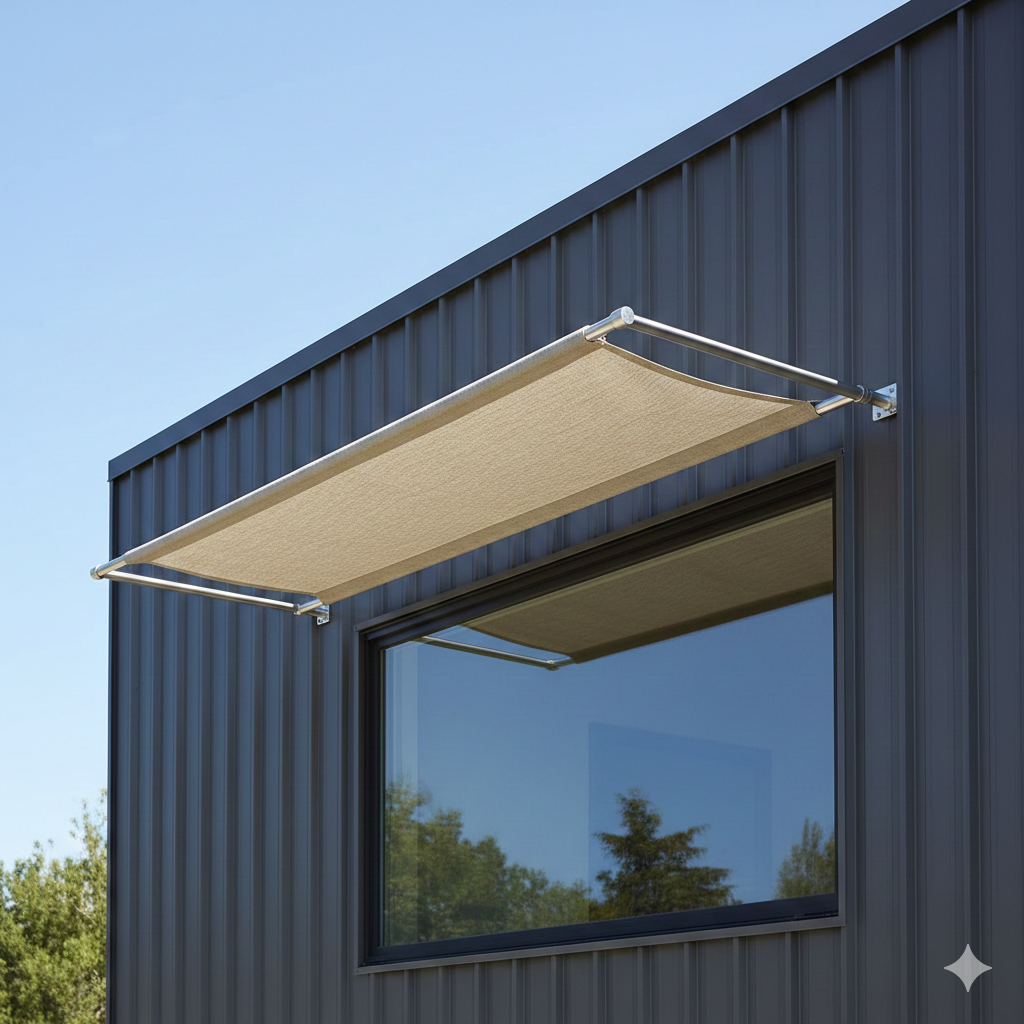
Idea 1: A Window Awning
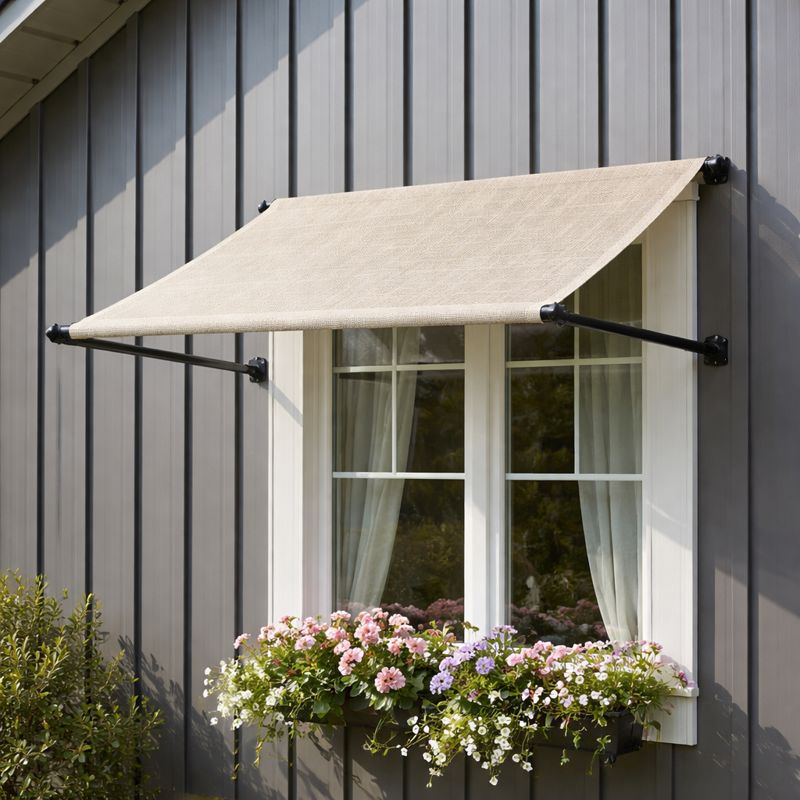
Awnings over a window solve the problem that sun can be quite hot, increasing the AC load of a house significantly. Sunny windows, as lovely as they are, can also be a nuisance for other tasks, like working on a computer, increasing eye fatigue. If, like me, you are trying to design a house where there is minimal siding penetration, or you simply have a house design that didn’t include awnings in quite the right places, here’s an idea for adding an awning.
Start with a standing seam metal clamp. For the simplest version, add a lightweight aluminum M8-1.25 threaded rod into the clamp, slide over a strip of cloth (a properly measure loop), then add a bolt at the end. Variations might include the use of eyebolts and fabric with grommets, with the fabric tied to the eyebolts, rather like a sail. Using upper and lower clamps might allow a sloped awning (a flat awning is easiest but won’t protect from lower sun angles).
The main problem here is that this awning will act like a sail in the wind, and can apply a lot of force. Or get covered with a layer of heavy snow. An awning extending out 1 or 2 feet, and not very widely spaced between clamps, is likely feasible, but gigantic 8′ awnings like you see over some restaurants (or larger) would definitely not work with this approach. Using an open mesh or slotted fabric would also reduce the wind and snow load and might allow for a longer awning. Do take this risk seriously, you don’t want a storm ripping the siding off your house.
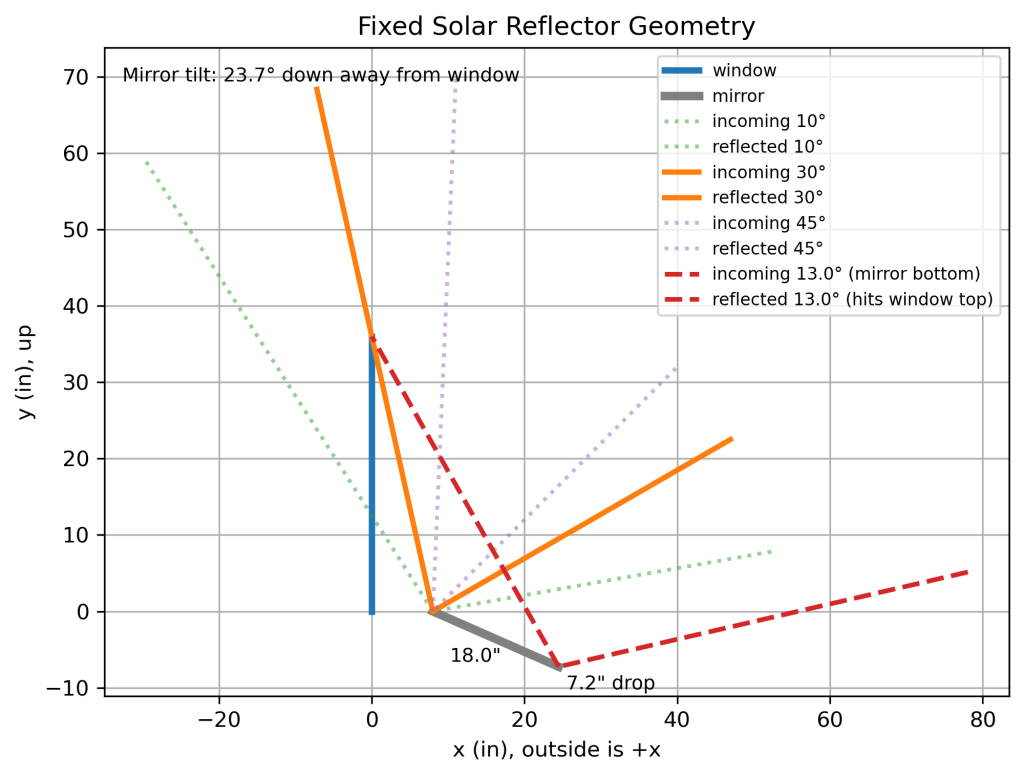
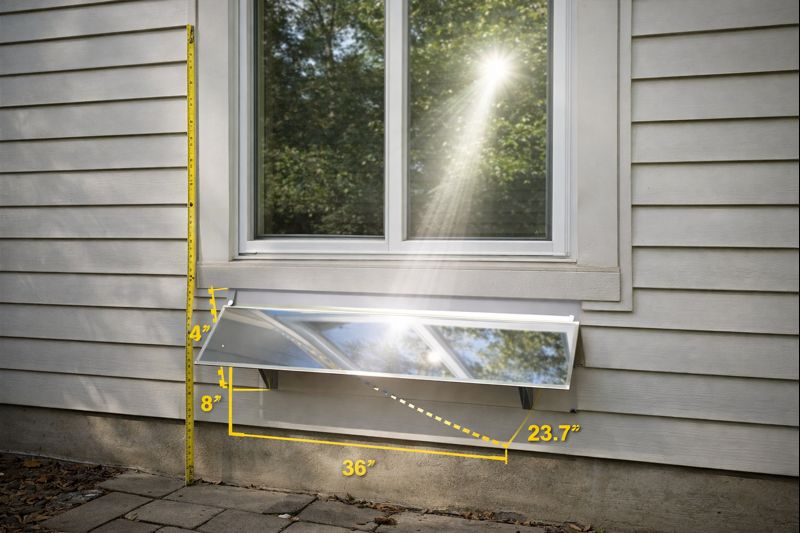
Idea 2: Window Solar Reflectors
A separate issue with a house is that windows tend to be lovely, but also, have terrible insulating value. They are only one step away from being a hole in the wall, even with the most advanced windows. My parents farm has this exact problem. It is extremely well insulated (R-48 SIP walls) but some of the rooms still get rather cold, for one simple reason: giant windows (they do look nice).
One easy solution is to make the windows smaller, if you can convince your wife, that is. In order then to increase the light coming in the house to make up for it, here is one idea: a solar reflector.
Solar reflectors are nothing new, we use them to create energy. However tracking heliostats require electronics, are expensive, tend to break, and then not be repaired. The idea here is for a much simpler fixed angle panel that rejects the hottest angles of sunlight, noon in summer, by reflecting them above the window, being designed more for increased winter and evening sun, reflecting these into the ceiling.
I wrote a script to optimize the reflector angle and sizing, shown for a window 36 inches high (just a bit under 1 meter). Using solar angles from the NOAA, I figured out what solar angles were “too hot”, higher angles in summer which I wish to reflect off above the window, and then measured for lower angles seen more in winter. While it won’t add tons more light (we do have LED bulbs for that), it can increase light in by up to about 30%, and this light will be reflected into the ceiling, bouncing winter light that normally is ‘stuck to the floor.’
Long story short, reflective piece of metal, thin and lightweight, shiny, reflects more light into house with a smaller window. Mounted possibly with standing seam metal siding clamps. If this is light enough, you might even be able to mount it with strong, rubber coated magnets to the siding.
Idea 3: Clamp for Not-Quite-Roof Vents
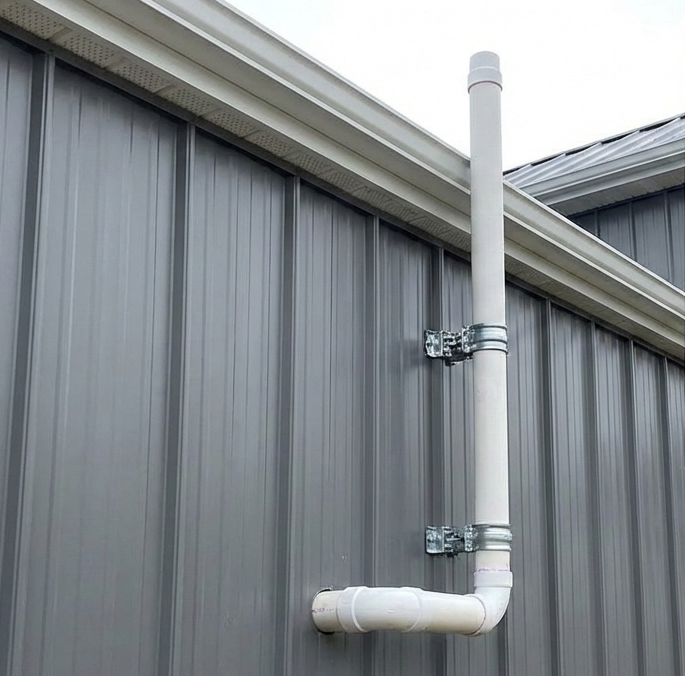
The most exciting idea for me, and most boring for most of you, is the ability to use pipe clamps on vents that need to extend above the roof. Here in Minnesota, plumbing vents must go above the roof, and usually this means a hole through the roof. Holes through the roof are even worse than holes in siding (water, especially in the ice form, tends to stay on flatter surfaces like roofs) and cause problems. To bypass this, we can run a plumbing vent out the side of a house and use clamps with pipe clamps (“CanDuit” branded from S-5!) to hold it in place against the wind.
Idea 4: Holding A Downspout Stable
Really not a complicated idea, but practical and simple. Downspouts can be attached to the siding to prevent wobble and flex in wind using the pipe clamps for the siding clamps.
Idea 5: Juliet balcony
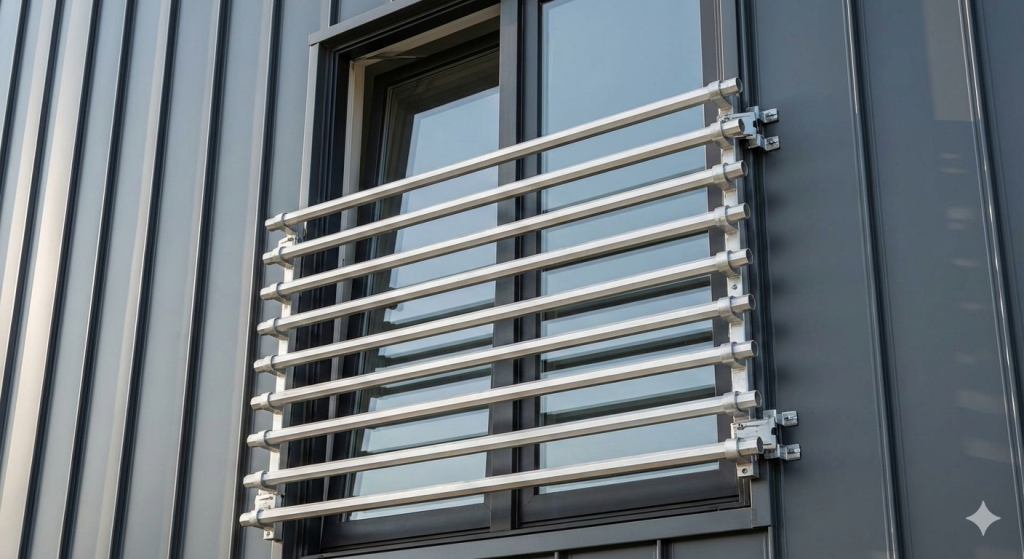
My wife really wants a Juliet balcony. And as nice as they are, for something that is mostly cosmetic (a large casement or tilt and turn window would do the job just as well, as I have pointed out), I hate the idea of compromising the moisture and thermal integrity of the wall. The alternative idea here is to use the snow guards (for example, X-Gard 1.0), as some examples have clear span ratings around 4′ wide, plenty of room for a large door as horizontal cross guards. Balcony railings require 200 lbs of load rating in any direction, must rise up 36″ in residential, and must have a railing that prevents the passage of objects 4″ or larger. All can be achieved here. Note however that we do not have any “floor” to this balcony design. It is simply a door with cross-guards.
For all of these ideas, I am considering adding a little cold galvanizing zinc paint (high zinc paint) to the bolts and siding right next to them after they are clamped. Probably unnecessary.
Have I built any of these yet? No. But I intend to (in probably 2 or 3 years at the current rate). Please comment if you beat me to constructing these!
Colin Catlin, 2026